Microsoft announced the release of Exchange 2013 last fall, but this was not very useful to most of us, because there was no support for previous versions of Exchange until new Service Packs and Hotfixes were available. In other words, you could not install Exchange 2013 into your current Exchange organization. In February Microsoft finally released Exchange 2007 SP3 RU10 and Exchange 2010 SP3, to enable coexistence between the platforms. As is typical of Microsoft, they support an N-2 upgrade path. This means you can upgrade to 2013 from two versions back. Exchange 2003 (and prior) version will not allow upgrade to Exchange 2013. In-place upgrades of Exchange 2007 and 2010 versions are not supported either. This is typical and even if it was supported I would never recommend it. It’s nice to start from scratch and deploy a new Exchange environment and apply the things you’ve learned from previous installs.
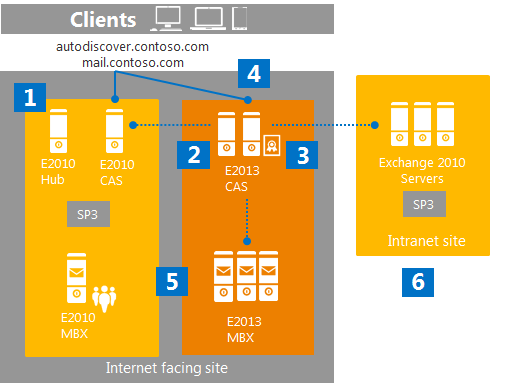
My test environment includes Forefront Threat Management Gateway 2010, so the upgrade path will include the steps for modifying and testing client access through the TMG as well. Here is a general diagram of my lab environment. It is running:
- Two Exchange 2010 servers running combined CAS/HUB role, behind a Kemp Technologies VLM1000 for load-balancing
- Two Exchange 2010 mailbox role servers configured in a single Database Availability Group (DAG)
- One Exchange Unified Messaging role server connected to a Lync 2010 environment
As I mentioned, an in-place upgrade is not recommended or supported, so we will be building Exchange 2013 side-by-side in the same Active Directory (AD) site as Exchange 2010.
Some things to note:
- Each organization requires at a minimum one Client Access server and one Mailbox server in the Active Directory forest. Additionally, each Active Directory site that contains a Mailbox server must also contain at least one Client Access server. If you’re separating your server roles, we recommend installing the Mailbox server role first.
- The computer you install Exchange 2013 on must have a supported operating system (such as Windows Server 2008 R2 with Service Pack 1 (SP1) or Windows Server 2012), have enough disk space, be a member of an Active Directory domain, and satisfy other requirements. For information about system requirements, see Exchange 2013 System Requirements.
Which version of Windows Server 2012?
When installing on Windows Server 2012 you now have two options compared to older versions of Windows: Standard Edition and Datacenter. In the past we had to use Enterprise edition for clustering, etc. Microsoft has done away with Enterprise edition. All aspects of Exchange 2013 will run on Windows 2012 Standard edition.
Checklist for updating from Exchange 2010:
- Prepare your Environment
- Verify your prerequisites
- Install Exchange 2010 SP3 across your organization
- Prepare Active Directory with the Exchange 2013 schema
- Validate existing client access
- Deploy Exchange 2013 servers
- Install both Exchange 2013 CAS and Mailbox
- Obtain and Deploy Certificates
- Obtain and deploy certificates on your E2013 CAS servers
- Switch Primary Namespace to Exchange 2013 CAS
- Exchange 2013 fields all traffic, including traffic from Exchange 2010 users
- Validate client access
- Move Mailboxes
- Build out your Exchange 2013 Database Availability Groups (DAGs)
- Move Exchange 2010 mailboxes to Exchange 2013
- Repeat for additional sites
Installing Exchange 2013 Prerequisites on Windows 2012
Microsoft TechNet recommends running two different cmdlets based on server role, but if you compare the two they are exactly the same. Therefore, I recommend running the following on each Exchange 2013/Windows 2012 server.
- Open PowerShell
- Run the following cmdlet:
Install-WindowsFeature AS-HTTP-Activation, Desktop-Experience, NET-Framework-45-Features, RPC-over-HTTP-proxy, RSAT-Clustering, RSAT-Clustering-CmdInterface, RSAT-Clustering-Mgmt, RSAT-Clustering-PowerShell, Web-Mgmt-Console, WAS-Process-Model, Web-Asp-Net45, Web-Basic-Auth, Web-Client-Auth, Web-Digest-Auth, Web-Dir-Browsing, Web-Dyn-Compression, Web-Http-Errors, Web-Http-Logging, Web-Http-Redirect, Web-Http-Tracing, Web-ISAPI-Ext, Web-ISAPI-Filter, Web-Lgcy-Mgmt-Console, Web-Metabase, Web-Mgmt-Console, Web-Mgmt-Service, Web-Net-Ext45, Web-Request-Monitor, Web-Server, Web-Stat-Compression, Web-Static-Content, Web-Windows-Auth, Web-WMI, Windows-Identity-Foundation
Client Access Role
Install the following software:
Mailbox role
Install the following software:
Prepare Active Directory for Exchange 2013
Starting with Exchange 2010 I believe these steps are built into the GUI install, but call me old-school, I still prefer to use the command-line to perform Schema updates. This is a very good practice especially if you run Exchange in multiple AD sites where AD replication might not be instantaneous.
| NOTE: Something new for Exchange 2013, you must add the /IAcceptExchangeServerLicenseTerms switch when running Setup.exe |
- Run Setup.exe /PreparedSchema /IAcceptExchangeServerLicenseTerms
- Run Setup.exe /PreparedAD /IAcceptExchangeServerLicenseTerms
- Before running this step I was required to reboot. Run Setup.exe /PreparedAllDomains /IAcceptExchangeServerLicenseTerms
Now your environment is ready to install Exchange 2013. Click on the link below for Part 2 in this series.