In order to run SMLets on a computer it must have some of the SCSM console DLLs installed. Anton Gritsenko wrote this great article about how to install these without the need to install the SCSM console. However, due to some of the changes made to Windows Server 2012 and 2012 R2, these steps will no longer work. The problem is you can no longer register DLLs by copying them to the assembly folder. You now have to use the gacutil.exe utility to registry them.
1. Download and Install SMLets – http://smlets.codeplex.com/
2. Open PowerShell and set the Execution Policy to remotesigned using the command:
Set-ExecutionPolicy remotesigned -force
3. Download Windows 8.1 SDK – http://msdn.microsoft.com/en-us/windows/desktop/bg162891.aspx
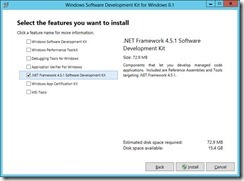
4. Launch the SDK Installer
5. When prompted select the feature .NET Framework 4.5.1 Software Development Kit
6. Copy the files Microsoft.EnterpriseManagement.Core.dll and Microsoft.EnterpriseManagement.ServiceManager.dll from c:Program FilesMicrosoft System CenterService Manager 2010SDK Binaries to your Orchestrator server.
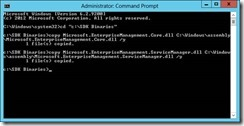
7. Open an elevated command prompt and navigate to the folder containing the Service Manager DLLs.
8. Enter the commands:
copy Microsoft.EnterpriseManagement.Core.dll C:WindowsassemblyMicrosoft.EnterpriseManagement.Core.dll /y
copy Microsoft.EnterpriseManagement.ServiceManager.dll C:WindowsassemblyMicrosoft.EnterpriseManagement.ServiceManager.dll /y
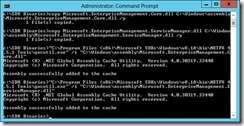
9. Once the DLL’s are copied you will not need to register them. Do this by entering the commands below:
“C:Program Files (x86)Microsoft SDKsWindowsv8.1AbinNETFX 4.5.1 Toolsgacutil.exe” /i “C:WindowsassemblyMicrosoft.EnterpriseManagement.Core.dll”
“C:Program Files (x86)Microsoft SDKsWindowsv8.1AbinNETFX 4.5.1 Toolsgacutil.exe” /i “C:WindowsassemblyMicrosoft.EnterpriseManagement.ServiceManager.dll”
10. Open C:Program FilesCommon FilesSMLetsSMLets.psm1
11. Add a # to the beginning on lines 4, 5, and 6 to comment them out.
#requires -version 2.0 # handy global variables $GLOBAL:SMADLL = ([appdomain]::CurrentDomain.getassemblies()|?{$_.location -match "System.Management.Automation.dll"}).location #$GLOBAL:SMDIR = (Get-ItemProperty 'hklm:/software/microsoft/System Center/2010/Service Manager/Setup').InstallDirectory #$GLOBAL:SMSDKDIR = "${SMDIR}SDK Binaries" #$GLOBAL:SMDLL = "${SMSDKDIR}/Microsoft.EnterpriseManagement.Core.dll" $GLOBAL:EMGTYPE = "Microsoft.EnterpriseManagement.EnterpriseManagementGroup" $GLOBAL:DATAGENDIR = "$psScriptRootDataGen"

12. Comment out line 46, and on line 47 add the line below change SCSMSERVERNAME with the name of your management server.

$GLOBAL:smdefaultcomputer = "SCSMSERVERNAME"
# load the Service Manager Core assembly set-alias -scope global load import-assembly #load $SMDLL | out-null $GLOBAL:smdefaultcomputer = "SCSMSERVERNAME"

13. Save and close SMLets.psm1
I recently ran into an issue where a user had uploaded an Outlook Message file to a web application. The users were reporting an error that each time they tried to click on a link to the .MSG file, the web browser would display an error message that the file had been moved or could not be found. This issue was happening across all web browsers, including Internet Explorer, Chrome, Firefox and Safari.
The web server was running Windows 2008 R2 Service Pack 1.
What I did not realize and was surprising to me was that a Mime Type is not defined by default for .MSG files in IIS, surprising because it is a Microsoft Outlook file extension and a Microsoft web server.
The fix was surprisingly simple. I logged into the web server and opened the IIS Manager.
I selected the Web server and clicked on the Mime Types icon.
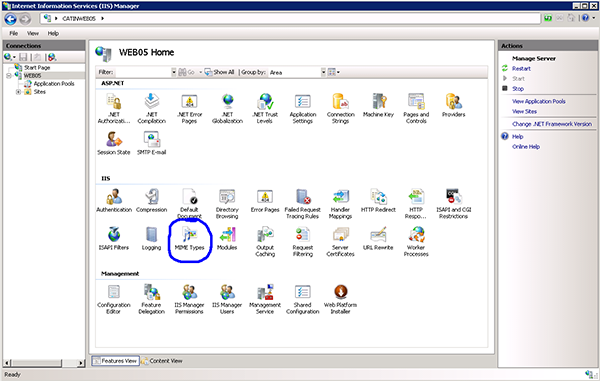
Click the Add link and create the following new .msg Mime Type: application/vnd.ms-outlook
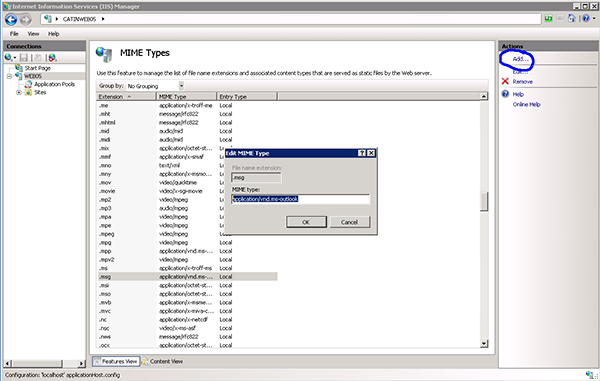
This immediately fixed the issue without an IISRESET or server reboot.
I recommend that you always activate you windows install. However, in some lab and test environments you may not be able to activate right away. With Windows 8.1 you are not able to change the lock screen picture or setup the lock screen slideshow until you activate it. However, I have found a way that you can at least change the lock screen picture before you activate.
DISCLAIMER: This requires changing permissions to a system folder. This is not recommended in production environments. Do so at your own risk.
Navigate to C:\ProgramData\Microsoft\Windows\SystemData\S-1-5-18\ReadOnly\LockScreen_Z
You will need to take ownership of the SystemData folder.
In the LockScreen_Z folder there will be a file name something similar to LockScreen___1920_1080.jpg. Your file name may be different based on your screens resolution.
All you need to do from here, is rename the picture you want to use for your the lock screen and copy it into the folder LockScreen_Z overwriting the existing file.
Issue: Cannot resolve the collation conflict between “SQL_Latin1_General_CP1_CI_AS” and “Latin1_General_CI_AS”
I received the following error when I was attempting to compare columns in a SQL query between two tables located in two separate databases. In this case, the collation settings between the two databases were configured differently. Rather make any changes to the databases, I was able to apply a simple fix to my SQL query:
ORIGINAL QUERY –
UPDATE
[database1].[dbo].[table1]
SET
[id] = (SELECT [d2t1].[id] FROM [database2].[dbo].[table1] [d2t1] WHERE [d2t1].[name] = [database1].[dbo].[table1].[name])
WHERE
[id] IS NULL
FIX –
Simply apply the default collation to the fields you are comparing.
UPDATE
[database1].[dbo].[table1]
SET
[id] = (SELECT [d2t1].[id] FROM [database2].[dbo].[table1] [d2t1] WHERE [d2t1].[name] COLLATE DATABASE_DEFAULT = [database1].[dbo].[table1].[name] COLLATE DATABASE_DEFAULT)
WHERE
[id] IS NULL
Find out more about SQL here:
On many occasions, I am asked to run a quick ad-hoc query and dump the results into an Excel spreadsheet. This is typically a piece of cake except in those cases when I am asked to include a long description field. In some cases, the long description field might contain new line characters. This wreaks havoc when I try to copy the results into Excel or save to a comma-delimited list, because the line breaks cause the row in Excel to break out into multiple rows. Messy to clean up.

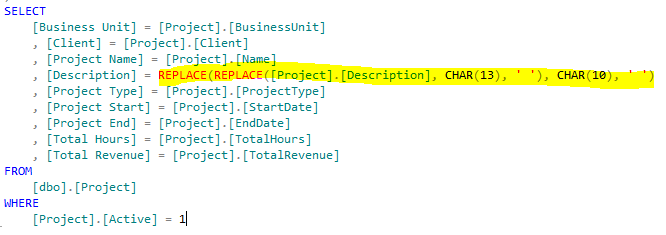
If you want to ensure that your description field does not return any line breaks and new lines, it is simple to remove those straight in the SQL query:
Here is how to do it:
The idea behind OSD in Configuration Manager is automation. Right? We want to create a process to eliminate as many manual tasks as possible. Some companies have their technicians manually disable IPv6 on all adapters. Who wants to do all of that manual work when we can have it automated? My clients occasionally ask for a step in the OSD Task Sequence to disable IPv6. If you would like to disable IPv6 on all interfaces, you should do it in a way that is easily reversible on your client computers companywide. Here is how I did this for a recent client:
1) Download the 50409 (Disable IPv6) MSI from this link. Download the 50440 (Enable IPv6) MSI from this link. Put both of these files in an Application source folder.
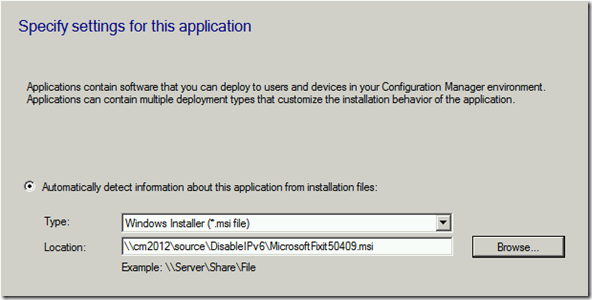
2) Create a new Application. Go to Software Library Workspace –> Application Management –> Applications. Right click and select “Create Application”.
3) In the Location box, type in the UNC path to the MSI. Click Next.
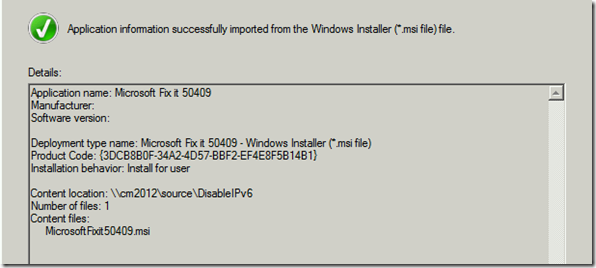
4) Because we used an MSI, the installation command line, uninstall command line, and Detection Method are all created for you. We’re not done yet. We will need to change these around. Click Next.
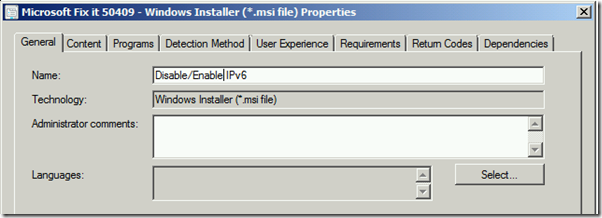
5) Change the name and the Installation program to what you see below. Click Next. Click Next. Click Close.

6) Click on your new Application in the console. Click on the Deployment Types tab at the bottom of the screen. Right click your Deployment Type and select Properties. Rename your Deployment Type.
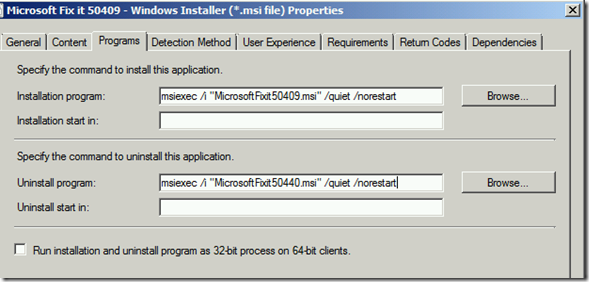
7) Click on the Programs tab. Change your Uninstall program to the line you see below.
(With normal applications, you would use “msiexec /x”. But, these are separate MSIs for disable and enable. Both are executed as installs.)
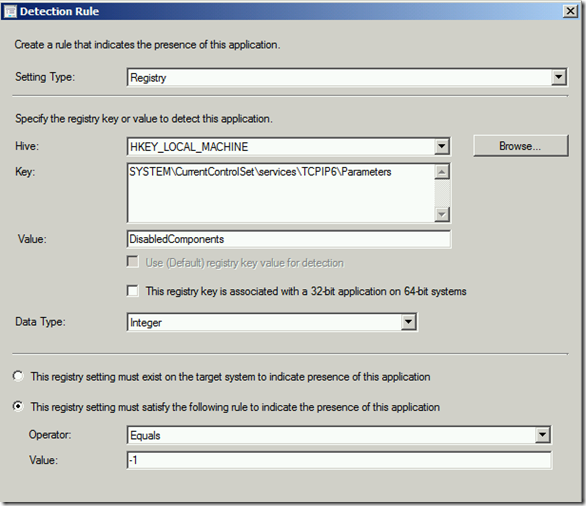
8) We will now point the Detection Method to the registry key that these are adding or changing. Click on the Detection Method tab. Delete the clause that was created by the initial process. Add a new clause as seen below. Click OK twice.
9) Distribute your new Application to your Distribution Points.
10) Test it on a collection of test computers. Monitor the registry integer you see above to make sure it works. When IPv6 is disabled, the value will be “ffffffff”. When it’s enabled, the value will be “0”. You can verify that IPv6 is disabled by opening a command prompt and typing in “ipconfig /all”. After the install and reboot, there should be no IPv6 listed. NOTE: This does not take the check box out of the IPv6 in the connection properties. But, IPv6 is disabled.
11) Now, put it into your Task Sequence for OSD.
12) This Application can also be used to deploy to computers in your company. Just make sure to make it “Required” and Hide all Notification. Deploy it as “Install” to disable IPv6. When you need to enable it in the future, just deploy it as “Uninstall”.
It does require a reboot to take effect. But, the reboot is suppressed in the command line. This will not reboot your client computers as long as your command lines are the same as mine.
If you only want to disable certain components of IPv6 instead of totally disabling/enabling it, you can use this same process with any of the MSIs in this link.
Enjoy! Let me know if you have any questions in the comments.