To submit a certificate request that contains a SAN to an enterprise CA, follow these steps:
- Open Internet Explorer.
- In Internet Explorer, connect to http://servername/certsrv.Note servername is the name of the Web server that is running Windows Server 2003 and that has the CA that you want to access.
- Click Request a Certificate.
- Click Advanced certificate request.
- Click Create and submit a request to this CA.
- In the Certificate Template list, click Web Server.Note The CA must be configured to issue Web Server certificates. You may have to add the Web Server template to the Certificate Templates folder in the Certification Authority snap-in if the CA is not already configured to issue Web Server certificates.
- Provide identifying information as required.
- In the Name box, type the fully qualified domain name of the domain controller.
- Under Key Options, set the following options:
- Create a new key set
- CSP: Microsoft RSA SChannel Cryptographic Provider
- Key Usage: Exchange
- Key Size: 1024 – 16384
- Automatic key container name
- Store certificate in the local computer certificate store
- Under Advanced Options, set the request format to CMC.
- In the Attributes box, type the desired SAN attributes. SAN attributes take the following form:
san:dns=dns.name[&dns=dns.name]
Multiple DNS names are separated by an ampersand (&). For example, if the name of the domain controller is corpdc1.fabrikam.com and the alias is ldap.fabrikam.com, both of these names must be included in the SAN attributes. The resulting attribute string appears as follows:
san:dns=corpdc1.fabrikam.com&dns=ldap.fabrikam.com - Click Submit.
- If you see the Certificate Issued Web page, click Install this Certificate.
How to use the Certreq.exe utility to create and submit a certificate request that includes a SAN
To use the Certreq.exe utility to create and submit a certificate request, follow these steps:
- Create an .inf file that specifies the settings for the certificate request. You can use the following sample code to create an .inf file.
 [Version]
Signature="$Windows NT$
[NewRequest]
Subject = "CN=corpdc1.fabrikam.com" ; must be the FQDN of domain controller
EncipherOnly = FALSE
Exportable = FALSE  ; TRUE = Private key is exportable
KeyLength = 1024    ; Common key sizes: 512, 1024, 2048,
                         ;    4096, 8192, 16384
KeySpec = 1             ; Key Exchange
KeyUsage = 0xA0     ; Digital Signature, Key Encipherment
MachineKeySet = True
ProviderName = "Microsoft RSA SChannel Cryptographic Provider"
ProviderType = 12
RequestType = CMC
; Omit entire section if CA is an enterprise CA
[EnhancedKeyUsageExtension]
OID=1.3.6.1.5.5.7.3.1 ; Server Authentication
[RequestAttributes]
CertificateTemplate = WebServer ;Omit  line if CA is a stand-alone CA
SAN="dns=.fabrikam.com&dns=ldap.fabrikam.com"- Save the file as Request.inf.
- Open a command prompt.
- At the command prompt, type the following command, and then press ENTER:
certreq -new request.inf certnew.req
This command uses the information in the Request.inf file to create a request in the format that is specified by the RequestType value in the .inf file. When the request is created, the public and private key pair is automatically generated and then put in a request object in the enrollment requests store on the local computer.
- At the command prompt, type the following command, and then press ENTER:
certreq -submit certnew.req certnew.cer
This command submits the certificate request to the CA. If there is more than one CA in the environment, the -config switch can be used in the command line to direct the request to a specific CA. If you do not use the -config switch, you will be prompted to select the CA to which the request should be submitted.
The -config switch uses the following format to refer to a specific CA:
computername\Certification Authority Name
For example, assume that the CA name is Corporate Policy CA1 and that the domain name is corpca1.fabrikam.com. To use the certreq command together with the –config switch to specify this CA, type the following command:
certreq -submit -config “corpca1.fabrikam.com\Corporate Policy CA1” certnew.req certnew.cer
If this CA is an enterprise CA and if the user who submits the certificate request has Read and Enroll permissions for the template, the request is submitted. The issued certificate is saved in the Certnew.cer file. If the CA is a stand-alone CA, the certificate request will be in a pending state until it is approved by the CA administrator. The output from the certreq -submit command contains the Request ID number of the submitted request. As soon as the certificate has been approved, it can be retrieved by using the Request ID number.
- Use the Request ID number to retrieve the certificate. To do this, type the following command, and then press ENTER:
certreq -retrieve RequestID certnew.cer
You can also use the -config switch here to retrieve the certificate request from a specific CA. If the -config switch is not used, you are prompted to select the CA from which to retrieve the certificate.
- At the command prompt, type the following command, and then press ENTER:
certreq -accept certnew.cer
After you retrieve the certificate, you must install it. This command imports the certificate into the appropriate store and then links the certificate to the private key that is created in step 4.
Discover our trending blogs:
- Collect DHCP information
- How to import and export foreign PowerShell characters
- Troubleshooting office online server
I needed to document DHCP information for a client across their large Enterprise consisting of more than 15 DHCP servers and each with several scopes. I dreaded documenting by hand, so I turned to my usual trick of collecting information by command line.
First I found just the article I need about how to get DHCP information at the command line from the Technet Article “To use DHCP commands interactively at the command prompt“
My first task was identifying all of the DHCP servers in the organization. Now that could have been easily accomplished from the MMC snap-in, but this is about the Command line.
So I used netsh DHCP to accomplish that as well.
- Open Command Prompt.
- Type netsh.
- At the netsh> command prompt, type dhcp.
- At the netsh dhcp> command prompt, type show server. This will give you a list of servers within the current Active Directory domain.
Now depending on what information you need to retrieve you can dive down into each server and then further into each scope to retrieve information. I needed to identify the scopes on each server, where their databases were located, and some general idea of the usage of each scope. And I needed to record this to a text file. So I decided to go into each server and get targeted information from each one.
So I dug up the following commands:
- server \Server01 — Switches which server information is retrieved from. Or, type: server\IPAddress which takes us to the netsh dhcp server> prompt, then I retrieved the information that I wanted using the following commands.
- show scope — Shows basic scope information
- show mibinfo — show scope use information
- show dbproperties — shows Database information
There are several other commands available, use /help to search for the one you need and you can reference this for usage: http://technet.microsoft.com/en-us/library/cc787375.aspx.
You might also look at the dump command. This actually gives you information about the options of each scope when used at the server level. Or you can dig down into each scope using the command: scope ipaddress
Also the show optiondef command will give you the definitions of each scope option. Option 51 is lease time as measured in seconds (that being the most common one you’ll need.
And I discovered that I could run one after the other in a batch file, or in my case by modifying a text file and pasting into the command line.
- Netsh
- dhcp
- server \Server01
- show scope
- show mibinfo
- show dbproperties
- server \Serverdc01
- show scope
- show mibinfo
- show dbproperties
- server \Serverdc02
- show scope
- show mibinfo
- show dbproperties
- server \Serverrdp01
- show scope
- show mibinfo
- show dbproperties
Unfortunately, piping the command out to a text file (>c:output.txt) didn’t work and I didn’t have Powershell on the network (Start-Transcript…..). So I ended up listing two or three servers at a time, while using the select all, cut, and paste commands in the CMD.exe window to paste the text into a notepad file.
All in all, a way quicker and cooler way of collecting DHCP information across the organization, than using the GUI.
You may find this blog interesting:
I was working for a Credit Card Processing company that wanted to remove Root Hints from their DNS servers and add forwarders to specific DNS servers. This didn’t seem like a difficult task at all. Open the DNS MMC and remove the Root Hints, unfortunately it turns out to be a little more complicated than that.
A few days after deleting all of the Root Hints, I noticed that the Root Hints had returned??? I was a little perplexed, so I deleted them again and rebooted the system. The Root Hints had returned!!! I quickly surmised that there was a config file somewhere that was being loaded on a reboot.
DNS stores the Root Hint configuration in a file called Cache.dns in the %systemroot%\system32\dns folder. Apparently only changes and additions made in the MMC are written to this file, not deletions.
Armed with this knowledge, I renamed the original file to keep a copy and created a blank Cache.dns file to match our design goals of removing root hints.
If for some reason you don’t want to use Group Policy to disable the Windows 7 Action Center, then there is a registry key you can set to disable it.
HKLMSOFTWAREMICROSOFTWINDOWSCURRENTVERSIONPOLICIESEXPLORER
HIDESCAHEALTH=DWORD:00000001

Once the registry key is set to a value of “1”, certain items will be greyed out in the Action Center configuration, and you will no longer see the Action Center icon in the system tray.
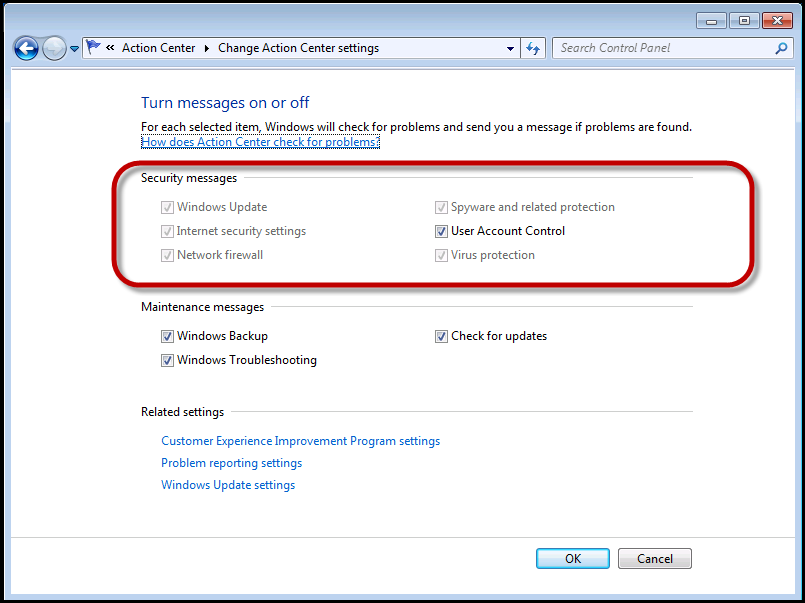
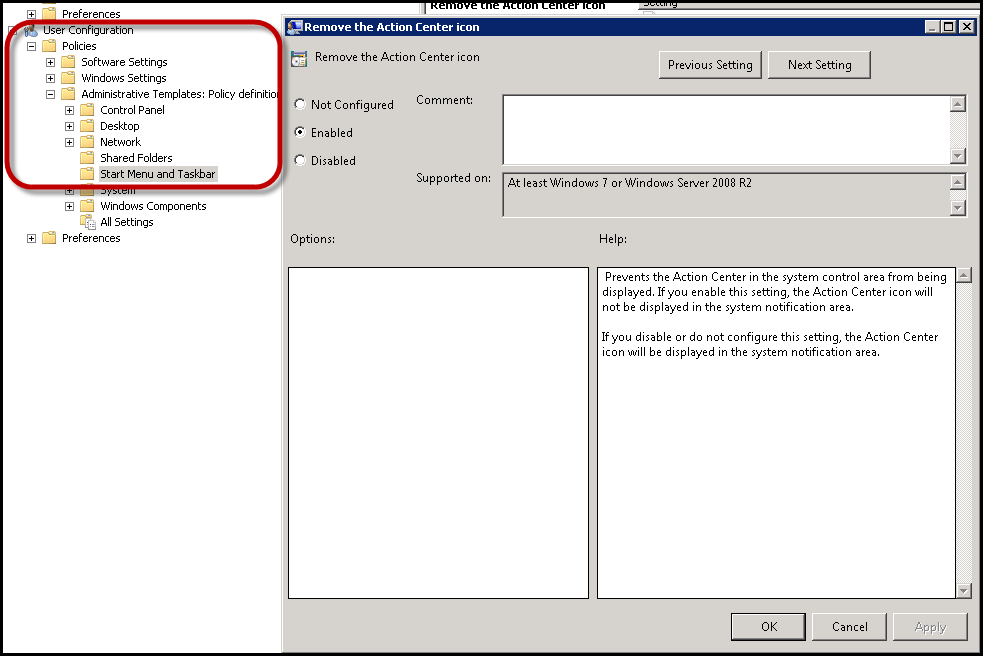
There is a simple Group Policy setting for this as well, this is generally my preference, but I had a client who wanted to disable it in the image regardless.
User Configuration – Policies – Admin Templates – Start Menu and TaskBar – Remove the Action Center Icon
In Operations Manager alerts can be generated by either a monitor or a rule (for background information on this see “The Rule of the Monitor”). Alerts which are generated by rules do not impact health state, and they will not auto-close themselves. This results in a situations where there may be alerts in your environment which may need to be manually closed on a daily or hourly basis. I worked with an organization which was using a large number of custom rules which they wanted the email notification to occur, but once that had occurred the alert could be closed. These are examples of situations where it is useful to have specific rule-generated alerts auto-close on a scheduled basis. This is all about decreasing the clutter in the OpsMgr console. By auto-closing these alerts we can focus on more actionable alerts which are occurring in the environment.
A while back I wrote a simple management pack called the Scheduled Result Management pack (or SRU). This management pack is good for auto-closing a small number of rule-generated alerts using overrides generated in the console. It does not work well however with large number of alerts to auto-close and it does not work well when the list will be constantly changing. In this type of a situation we can easily configure a scheduled task which will auto-close alerts which we specify based upon the content of a file on the system.
This blog article will discuss the steps required to create the folder and file structure, steps to create this task, how to debug the execution of the task, how to auto-close additional alerts, and will provide the sample file and script to perform the auto-close.
Creating the folder and file structure:
On the Root Management Server (RMS) we are creating a folder structure of c:\SCOMAutomation\CloseAlertByTextFile. The two files are CloseAlertByTextFile.ps1 (script later in this article) and TargetRules.txt (sample content later in this article).

Task Creation Steps:
Once the folder structure and files are available we’re going to create this in the task scheduler (this could also be created with a rule which is scheduled to run in OpsMgr but for simplicity of administration we are keeping this to the task scheduler). In Windows 2008 and higher this is available in:
Start, programs, administrative Tools, Task Scheduler
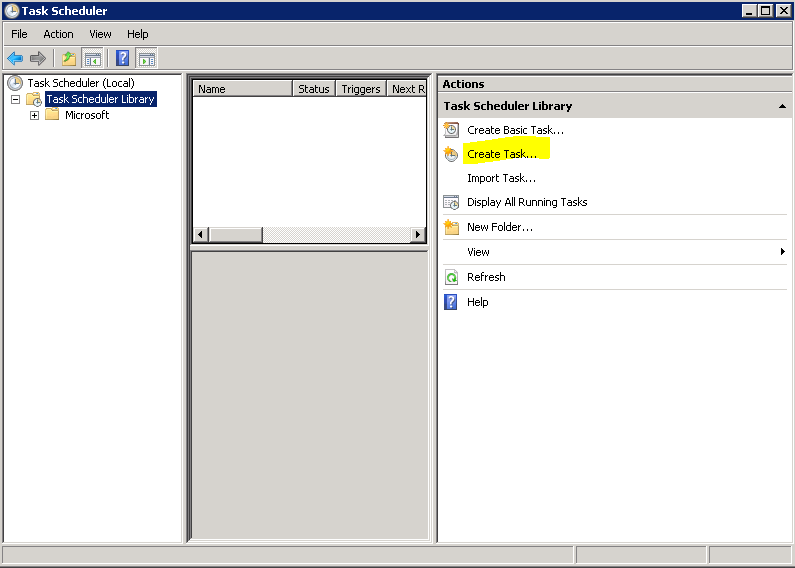
In the task scheduler use the Create Task option highlighted below:
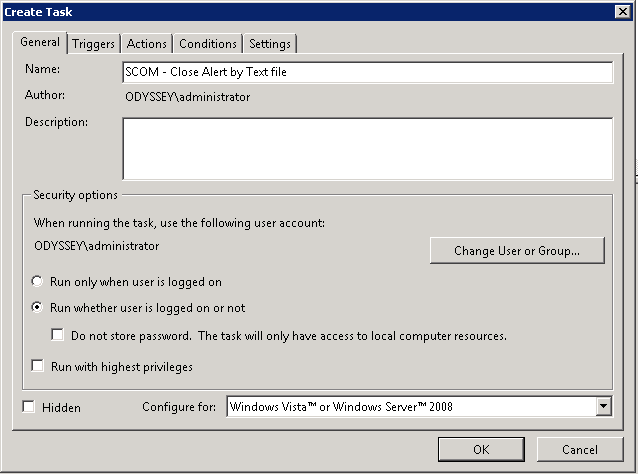
For the task we need to configure the general tab with the name (SCOM – Close Alert by Text file) and to run whether user is logged on or not. Also – avoid using the Hidden option as it’s harder to find the task to manually run the task after it is created.
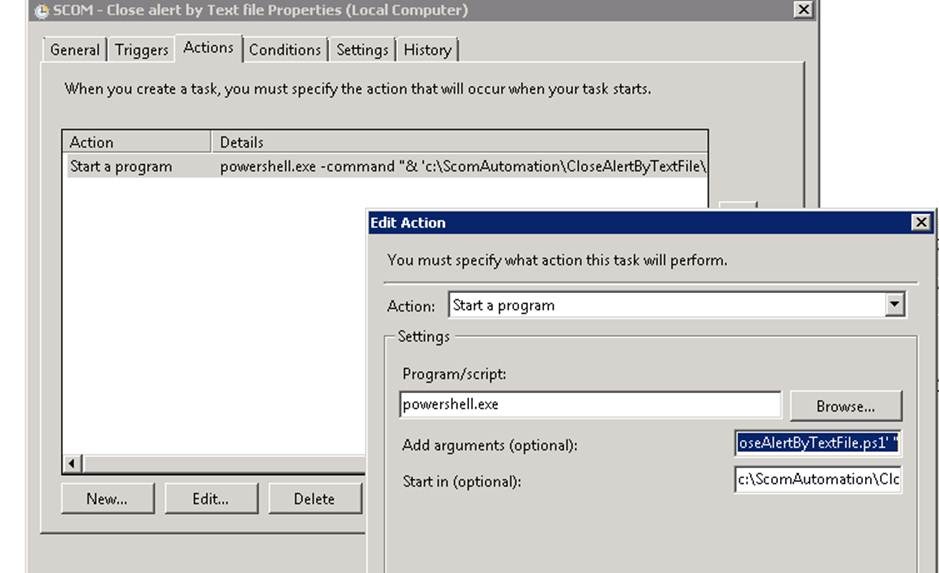
On the Actions pane we need to create a new action:
- Action = Start a program
- Program/Script = powershell.exe
- Add Arguments = -command “& ‘c:\ScomAutomation\CloseAlertByTextFile\CloseAlertByTextFile.ps1’ “
- Start in = c:\ScomAutomation\CloseAlertByTextFile
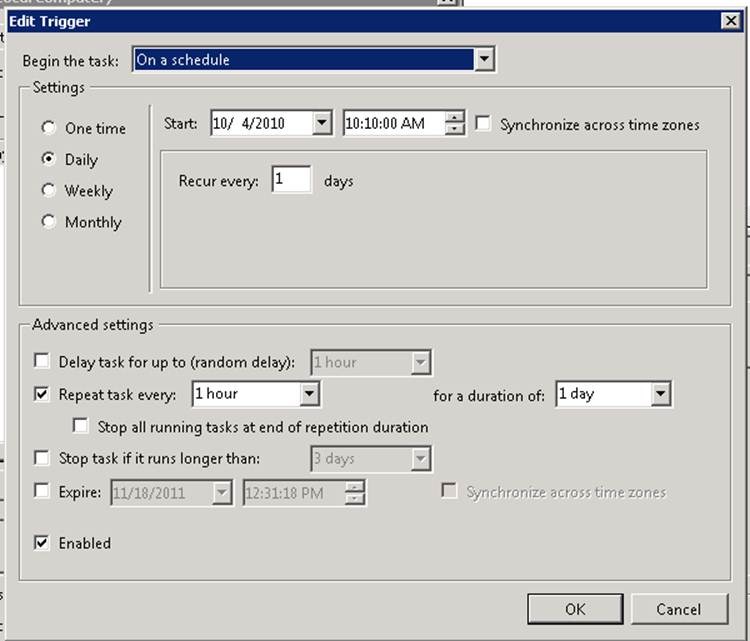
On the schedule task we are creating this to run daily every hour, depending upon the requirements for your environment this might only occur once a day or once a week.
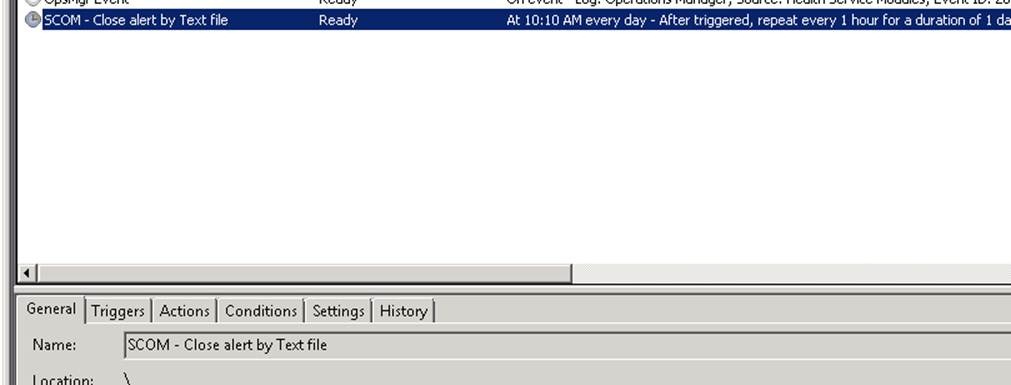
Once this is created we can manually run the task to test it’s functionality.
Debugging the Task execution:
The PowerShell script includes logging for events which are created in the Application Log. These include:
EventID 10002 – created with each rule and includes count of how many closed

Event 10010 – summarization of what was done and home many types of alerts were closed.

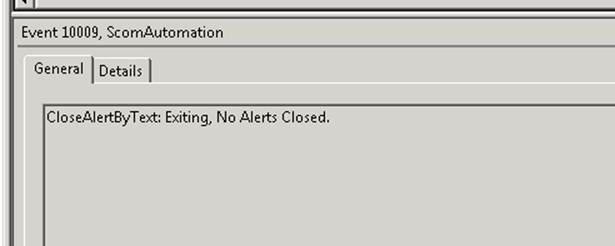
Event 10009 – Created if nothing was done
Event 10000 – Created as an error if the RMS server can’t be contacted.
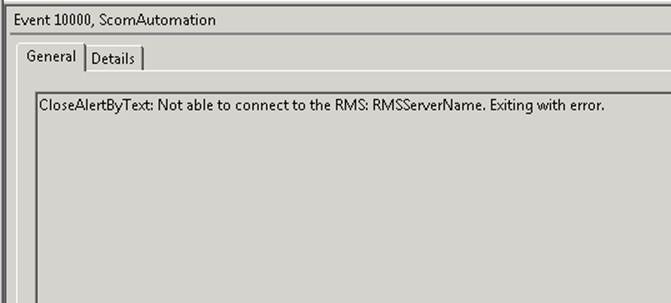
Adding to the alerts to auto-close:
The default alert listed in this article will not exist in your environment. For your environment I recommend that you find alerts generated by rules which you want to auto-close, and you can cut and paste from the OpsMgr console into the TargetRules.txt file as shown below (highlight the name of the alert shown in the Alert Details pane, control-C to copy).

TargetRules.txt
(There should not be any blank lines at the end of this file when it is created)
A SQL job failed to complete successfully.
CloseAlertByTextFile.ps1
(You will need to change the PS1 script to refer to “localhost” – assuming it’s going to run on the RMS or to the name of the RMS in your environment)
<#
.SYNOPSIS
Reads a text file and closes all OPS Manager Alerts that meet the criteria
.DESCRIPTION
Looks for a file called TargetRules.txt in the same folder as this script was ran from.
Logs a name and count for each rule that is closed in the EventLog under “Source” ScomAutomation.
The following events are logged if needed
10000 Exited with an error. The parameter wasn’t passed to the function correctly
10001 Lists how many instances of each Scom Event are closed
10002 Shows when the script exits each time it has ran.
10009 Shows if nothing is done.
.NOTES
File Name : CloseAlertByTextFile.ps1
Author : Larry Brown – [email protected]
Requires : PowerShell V2; Ops Manager PowerShell Dll Registered
#>

Function Out-ToEventLog
{
Param ($messageContents, $typeOfAlert, $NumberForOutput)
    $EventLog.WriteEntry($PrependInfo + $messageContents, $typeOfAlert, $NumberForOutput)

}

Function Clear-Alert
{
Param([string]$Alertname)
    $intInstanceCounter = 0
    If ($Alertname.Length -le 0){
            Out-ToEventLog "Alertname empty.. Nothing to close. Check the Alert text file for extra lines." "Warning" "10001"
            }
    Else{
        $criteria = [string]::Format("Name = '{0}' AND IsMonitorAlert = 0 AND ResolutionState < 255",$Alertname);
        Get-Alert -Criteria $criteria | ForEach-Object {
            [String]::Format("Closing Alert '{0}'",$_.Name);
            $_ | Resolve-Alert -Comment "Closed by Automation Script" | out-null;
            $intInstanceCounter = $intInstanceCounter + 1}
            }
    If($intInstanceCounter -gt 0){
        $global:intTypeCounter = $global:intTypeCounter + 1
        Out-ToEventLog "Closed $intInstanceCounter instance(s) of $Alertname" "Information" "10002"
       }
}

$INST = Split-Path -Parent $MyInvocation.MyCommand.Path

$global:intTypeCounter = 0

$rms = "RmsServerName"

$PrependInfo = "CloseAlertByText: "

Add-PSSnapin "Microsoft.EnterpriseManagement.OperationsManager.Client";

$EventLog = Get-EventLog -list | Where-Object {$_.Log -eq “Application”}
$EventLog.Source="ScomAutomation"

$mgConn = New-ManagementGroupConnection -connectionString:$rms;
if ( $mgConn -eq $null ){
    Out-ToEventLog "Not able to connect to the RMS: $rms. Exiting with error." "Error" "10000"
    return;
}
Set-Location "OperationsManagerMonitoring::";
Set-Location $rms;

foreach ($a in Get-Content "$INST\TargetRules.txt") {Clear-Alert $a}

if($global:intTypeCounter -gt 0){
    Out-ToEventLog "closed $global:intTypeCounter type(s) of Alert(s)" "Information" "10010"
    }
else{
    Out-ToEventLog "Exiting, No Alerts Closed." "Information" "10009"
}
Notes & Kudos!
- This script and the process was created by Larry Brown – well done man! You can follow Larry on twitter at: @lbrownfromtx
- This is designed to ONLY work for alerts generated by rules, not monitors. We do not want to auto-close monitor generated alerts (see the Rule of the Monitor at the start of this article for details).
In Operations Manager alerts can be generated by either a monitor or a rule (for background information on this see ” Scheduled Result Management pack (or SRU). This management pack is good for auto-closing a small number of rule-generated alerts using overrides generated in the console. It does not work well however with large number of alerts to auto-close and it does not work well when the list will be constantly changing. In this type of a situation we can easily configure a scheduled task which will auto-close alerts which we specify based upon the content of a file on the system. This blog article will discuss the steps required to create the folder and file structure, steps to create this task, how to debug the execution of the task, how to auto-close additional alerts, and will provide the sample file and script to perform the auto-close. Creating the folder and file structure: On the Root Management Server (RMS) we are creating a folder structure of c:SCOMAutomationCloseAlertByTextFile. The two files are CloseAlertByTextFile.ps1 (script later in this article) and TargetRules.txt (sample content later in this article). Task Creation Steps: Once the folder structure and files are available we’re going to create this in the task scheduler (this could also be created with a rule which is scheduled to run in OpsMgr but for simplicity of administration we are keeping this to the task scheduler). In Windows 2008 and higher this is available in: Start, programs, administrative Tools, Task Scheduler In the task scheduler use the Create Task option highlighted below: For the task we need to configure the general tab with the name (SCOM – Close Alert by Text file) and to run whether user is logged on or not. Also – avoid using the Hidden option as it’s harder to find the task to manually run the task after it is created. On the Actions pane we need to create a new action: Action = Start a program Program/Script = powershell.exe Add Arguments = -command “& ‘c:ScomAutomationCloseAlertByTextFileCloseAlertByTextFile.ps1’ ” Start in = c:ScomAutomationCloseAlertByTextFile On the schedule task we are creating this to run daily every hour, depending upon the requirements for your environment this might only occur once a day or once a week. Once this is created we can manually run the task to test it’s functionality. Debugging the Task execution: The PowerShell script includes logging for events which are created in the Application Log. These include: EventID 10002 – created with each rule and includes count of how many closed Event 10010 – summarization of what was done and home many types of alerts were closed. Event 10009 – Created if nothing was done Event 10000 – Created as an error if the RMS server can’t be contacted. Adding to the alerts to auto-close: The default alert listed in this article will not exist in your environment. For your environment I recommend that you find alerts generated by rules which you want to auto-close, and you can cut and paste from the OpsMgr console into the TargetRules.txt file as shown below (highlight the name of the alert shown in the Alert Details pane, control-C to copy). TargetRules.txt (There should not be any blank lines at the end of this file when it is created) A SQL job failed to complete successfully. CloseAlertByTextFile.ps1 (You will need to change the PS1 script to refer to “localhost” – assuming it’s going to run on the RMS or to the name of the RMS in your environment) <# .SYNOPSIS Reads a text file and closes all OPS Manager Alerts that meet the criteria .DESCRIPTION Looks for a file called TargetRules.txt in the same folder as this script was ran from. Logs a name and count for each rule that is closed in the EventLog under “Source” ScomAutomation. The following events are logged if needed 10000 Exited with an error. The parameter wasn’t passed to the function correctly 10001 Lists how many instances of each Scom Event are closed 10002 Shows when the script exits each time it has ran. 10009 Shows if nothing is done. .NOTES File Name : CloseAlertByTextFile.ps1 Author : Larry Brown – [email protected] Requires : PowerShell V2; Ops Manager PowerShell Dll Registered #> Function Out-ToEventLog { Param ($messageContents, $typeOfAlert, $NumberForOutput) $EventLog.WriteEntry($PrependInfo + $messageContents, $typeOfAlert, $NumberForOutput) } Function Clear-Alert { Param([string]$Alertname) $intInstanceCounter = 0 If ($Alertname.Length -le 0){ Out-ToEventLog “Alertname empty.. Nothing to close. Check the Alert text file for extra lines.” “Warning” “10001” } Else{ $criteria = [string]::Format(“Name = ‘{0}’ AND IsMonitorAlert = 0 AND ResolutionState < 255”,$Alertname); Get-Alert -Criteria $criteria | ForEach-Object { [String]::Format(“Closing Alert ‘{0}'”,$_.Name); $_ | Resolve-Alert -Comment “Closed by Automation Script” | out-null; $intInstanceCounter = $intInstanceCounter + 1} } If($intInstanceCounter -gt 0){ $global:intTypeCounter = $global:intTypeCounter + 1 Out-ToEventLog “Closed $intInstanceCounter instance(s) of $Alertname” “Information” “10002” } } $INST = Split-Path -Parent $MyInvocation.MyCommand.Path $global:intTypeCounter = 0 $rms = “RmsServerName” $PrependInfo = “CloseAlertByText: ” Add-PSSnapin “Microsoft.EnterpriseManagement.OperationsManager.Client”; $EventLog = Get-EventLog -list | Where-Object {$_.Log -eq “Application”} $EventLog.Source=”ScomAutomation” $mgConn = New-ManagementGroupConnection -connectionString:$rms; if ( $mgConn -eq $null ){ Out-ToEventLog “Not able to connect to the RMS: $rms. Exiting with error.” “Error” “10000” return; } Set-Location “OperationsManagerMonitoring::”; Set-Location $rms; foreach ($a in Get-Content “$INSTTargetRules.txt”) {Clear-Alert $a} if($global:intTypeCounter -gt 0){ Out-ToEventLog “closed $global:intTypeCounter type(s) of Alert(s)” “Information” “10010” } else{ Out-ToEventLog “Exiting, No Alerts Closed.” “Information” “10009” } Notes & Kudos! This script and the process was created by Larry Brown – well done man! You can follow Larry on twitter at: @ lbrownfromtx This is designed to ONLY work for alerts generated by rules, not monitors. We do not want to auto-close monitor generated alerts (see the Rule of the Monitor at the start of this article for details).
